Dotnet interactive as a rails-console replacement
The tool I miss most when not using ruby-on-rails (which I use at my day-job) is the rails console.
My main use for the console is to write queries in the same ORM language as the rest of my application.
For example, I might drop into the rails console to see the raw output of a query like Course.where('start_date < DateTime.now - 1.year').
Or, if I need to create some fake data, I could drop into another console and run something like Course.last.update(start_date: DateTime.now - 2.year).
Both of these would be easy enough to do in SQL, but I find it more convenient to use the application’s ORM and have access to any helper functions that I’ve already written.
Recently, I’ve tried to approximate this workflow using dotnet interactive, and I’ll describe that setup below. The finished result can be found here(github).
Motivational use cases
In an (my) ideal world, I would be able to write my type-safe C#, but still have the interactive workflow of ruby. Here are some things I might do while testing an (imaginary) ruby-on-rails application.
-
When I want to update the roles of some test user.
In the ruby console, I would write
User.where(email: 'test@test.org').first.update(role: 'admin').In C#, I would like to write the following in a similar C# console.
var user = context.Set<ApplicationUser>().Where(u => u.Email == "test@test.org").First(); user.role = "Admin"; context.SaveChanges(); -
When I want to destroy some testing data.
Ruby:
Bookmark.last.destroy.C#:
var bookmark = context.Bookmarks.Last(); context.Bookmarks.Remove(bookmark); context.SaveChanges(); -
When I want to find if any entities were left in an invalid state by some service.
Ruby:
User.where(status: 'invalid').pluck(:id)C#:
context.Users.Where(u => u.status == "invalid").Select(u => u.Id)
None of these are very complicated, and each of these problems might be solvable with SQL or just using the application that is built, but I have often found its easier to just manipulate the data directly in the languages I’m comfortable in. And, with dotnet interactive, its pretty easy to set that up in a C# project.
Dotnet interactive notebooks
dotnet interactive is a tool that allows C# to be run within Jupyter notebooks. And, combined with the vs code extension, you can get most of the nice intellisense completion of a full editor in this notebook format.
If you haven’t had the chance to use Jupyter notebooks, the basic idea is that they allow you to split code into “Blocks”. Each block can be run separately, but they all share global state. The output of each block is saved to the notebook file itself, allowing you to share code along with whatever output it produces in a single fille format.
So, how does this help us develop applications?
My basic use case is to set up a database context is one of the top code blocks, and then use each of the lower boxes as a real-time scratchpad for one-off queries.
For example, if I needed to find the sum of the ages of all my users for whatever business reason, I could write a block of code like
context.Users.Select(u => u.Age).Sum(), press ctrl+enter (or press the green ‘play’ button), and the output would pop up on my screen.
It really feels quite interactive.
Building a notebook
The steps to connect a notebook to a database context are fairly straight forward:
- Build the project
- Load the required entity framework nuget packages
- Load the project DLL (containing the reference to the DbContext you want to use)
- Create a DbContext object
- Use the DbContext however you see fit!
0. Create the notebook
To get started, install the dotnet interactive vscode extension.
Then, from the command menu select > .NET Interactive: Create new blank notebook.
This will create a new blank notebook file that you can save in the root of the project.
If you don’t want to commit this to version control, you can add an entry to the .gitignore or global gitignore file.
You can verify the extension is working and the version of dotnet being used is the latest by creating a cell with the follow code and click the Run all cells button.
Environment.Version

/* Output
Major	Minor	Build	Revision	MajorRevision	MinorRevision
5 0 0 -1 -1 -1
*/
1. Build the project
The dotnet interactive can switch the language type of a cell by using the #! magic string.
So, I created a powershell code block and execute dotnet build in the project.
#! pwsh

dotnet build
This should produce some output indicating which DDL was built, which will be useful in the next step
Microsoft (R) Build Engine version 16.8.0+126527ff1 for .NET
Copyright (C) Microsoft Corporation. All rights reserved.
  Determining projects to restore...
  All projects are up-to-date for restore.
  BookyApi -> /home/saahil/gitProjects/BookyApi/API/bin/Debug/net5.0/BookyApi.dll # <-- This is the DLL we will need to load
2. Load the required entity framework nuget packages
Create a new C# cell and add a reference to each nuget package that you would like to use.
Each line should be in the format #r "nuget:<package name>,<version>.
#r "nuget:Microsoft.EntityFrameworkCore.Design,5.0.0"
#r "nuget:Npgsql,5.0.0"
#r "nuget:Npgsql.EntityFrameworkCore.PostgreSQL,5.0.0"
Clicking Execute cell will install as expected.
3. Load the project DLL
To actually access the project code, you need to load the DLL much like the nuget packages.
This is done simply by padding a #r directive pointing to the DLL compiled in step 1.
My sample project has a line like this:
#r "./API/bin/Debug/net5.0/BookyApi.dll"
Note: Each time you build the project, you will need to restart the Jupyter kernel powering the notebook and reload this DLL.
4. Create a DbContext option
Next, I created a single cell with the DbContext and other bits of boilerplate I would want to use down the road.
That way, my later cells can just be simple queries with Linq.
Any namespace included here with a using statement will be usable in all the future cells.
Creating the DbContext object is easy enough to do via a connection string.
Once this object is created, it is globally accessible to other other code blocks as long as the kernel is running.
(Generally, not disposing a DbContext isn’t great, but for a simple interactive notebook it should be fine. This could be replaced with a factory & using statements).
Note to self: it would probably be useful to set up the entire service provider here so any service could be tested via dependency injection. For example, testing a some MediatR handler could be done by simply running
serviceProvider.GetService<MyHandler>().Handle(new())
using System.Linq;
using System.Text.Json;
using Microsoft.EntityFrameworkCore;
using BookyApi.API.Db;
using BookyApi.API.Models;
using BookyApi.API.Services.Extensions;

var options = new DbContextOptionsBuilder<BookyContext>();
options.UseNpgsql("Host=localhost;Database=BookyApI;Username=postgres;Password=example;Port=5432");
// The variable `context` will be available outside of this code block
var context = new BookyContext(options.Options);
5. Use the DbContext as you see fit!
Now that there is a globally available context object, it is easy to query and modify the database.
Because this is all just ‘plain old C# code’, I can copy and paste code from parts of my project into the code block to ensure it actually has the desired behavior, or continue to write new Linq queries as normal.
Note that the last statement not ending with a semicolon will be shown as output of that cell in a human-readable manner. This reduces the verbosity of needed to printing or logging each object that needs to be inspected.
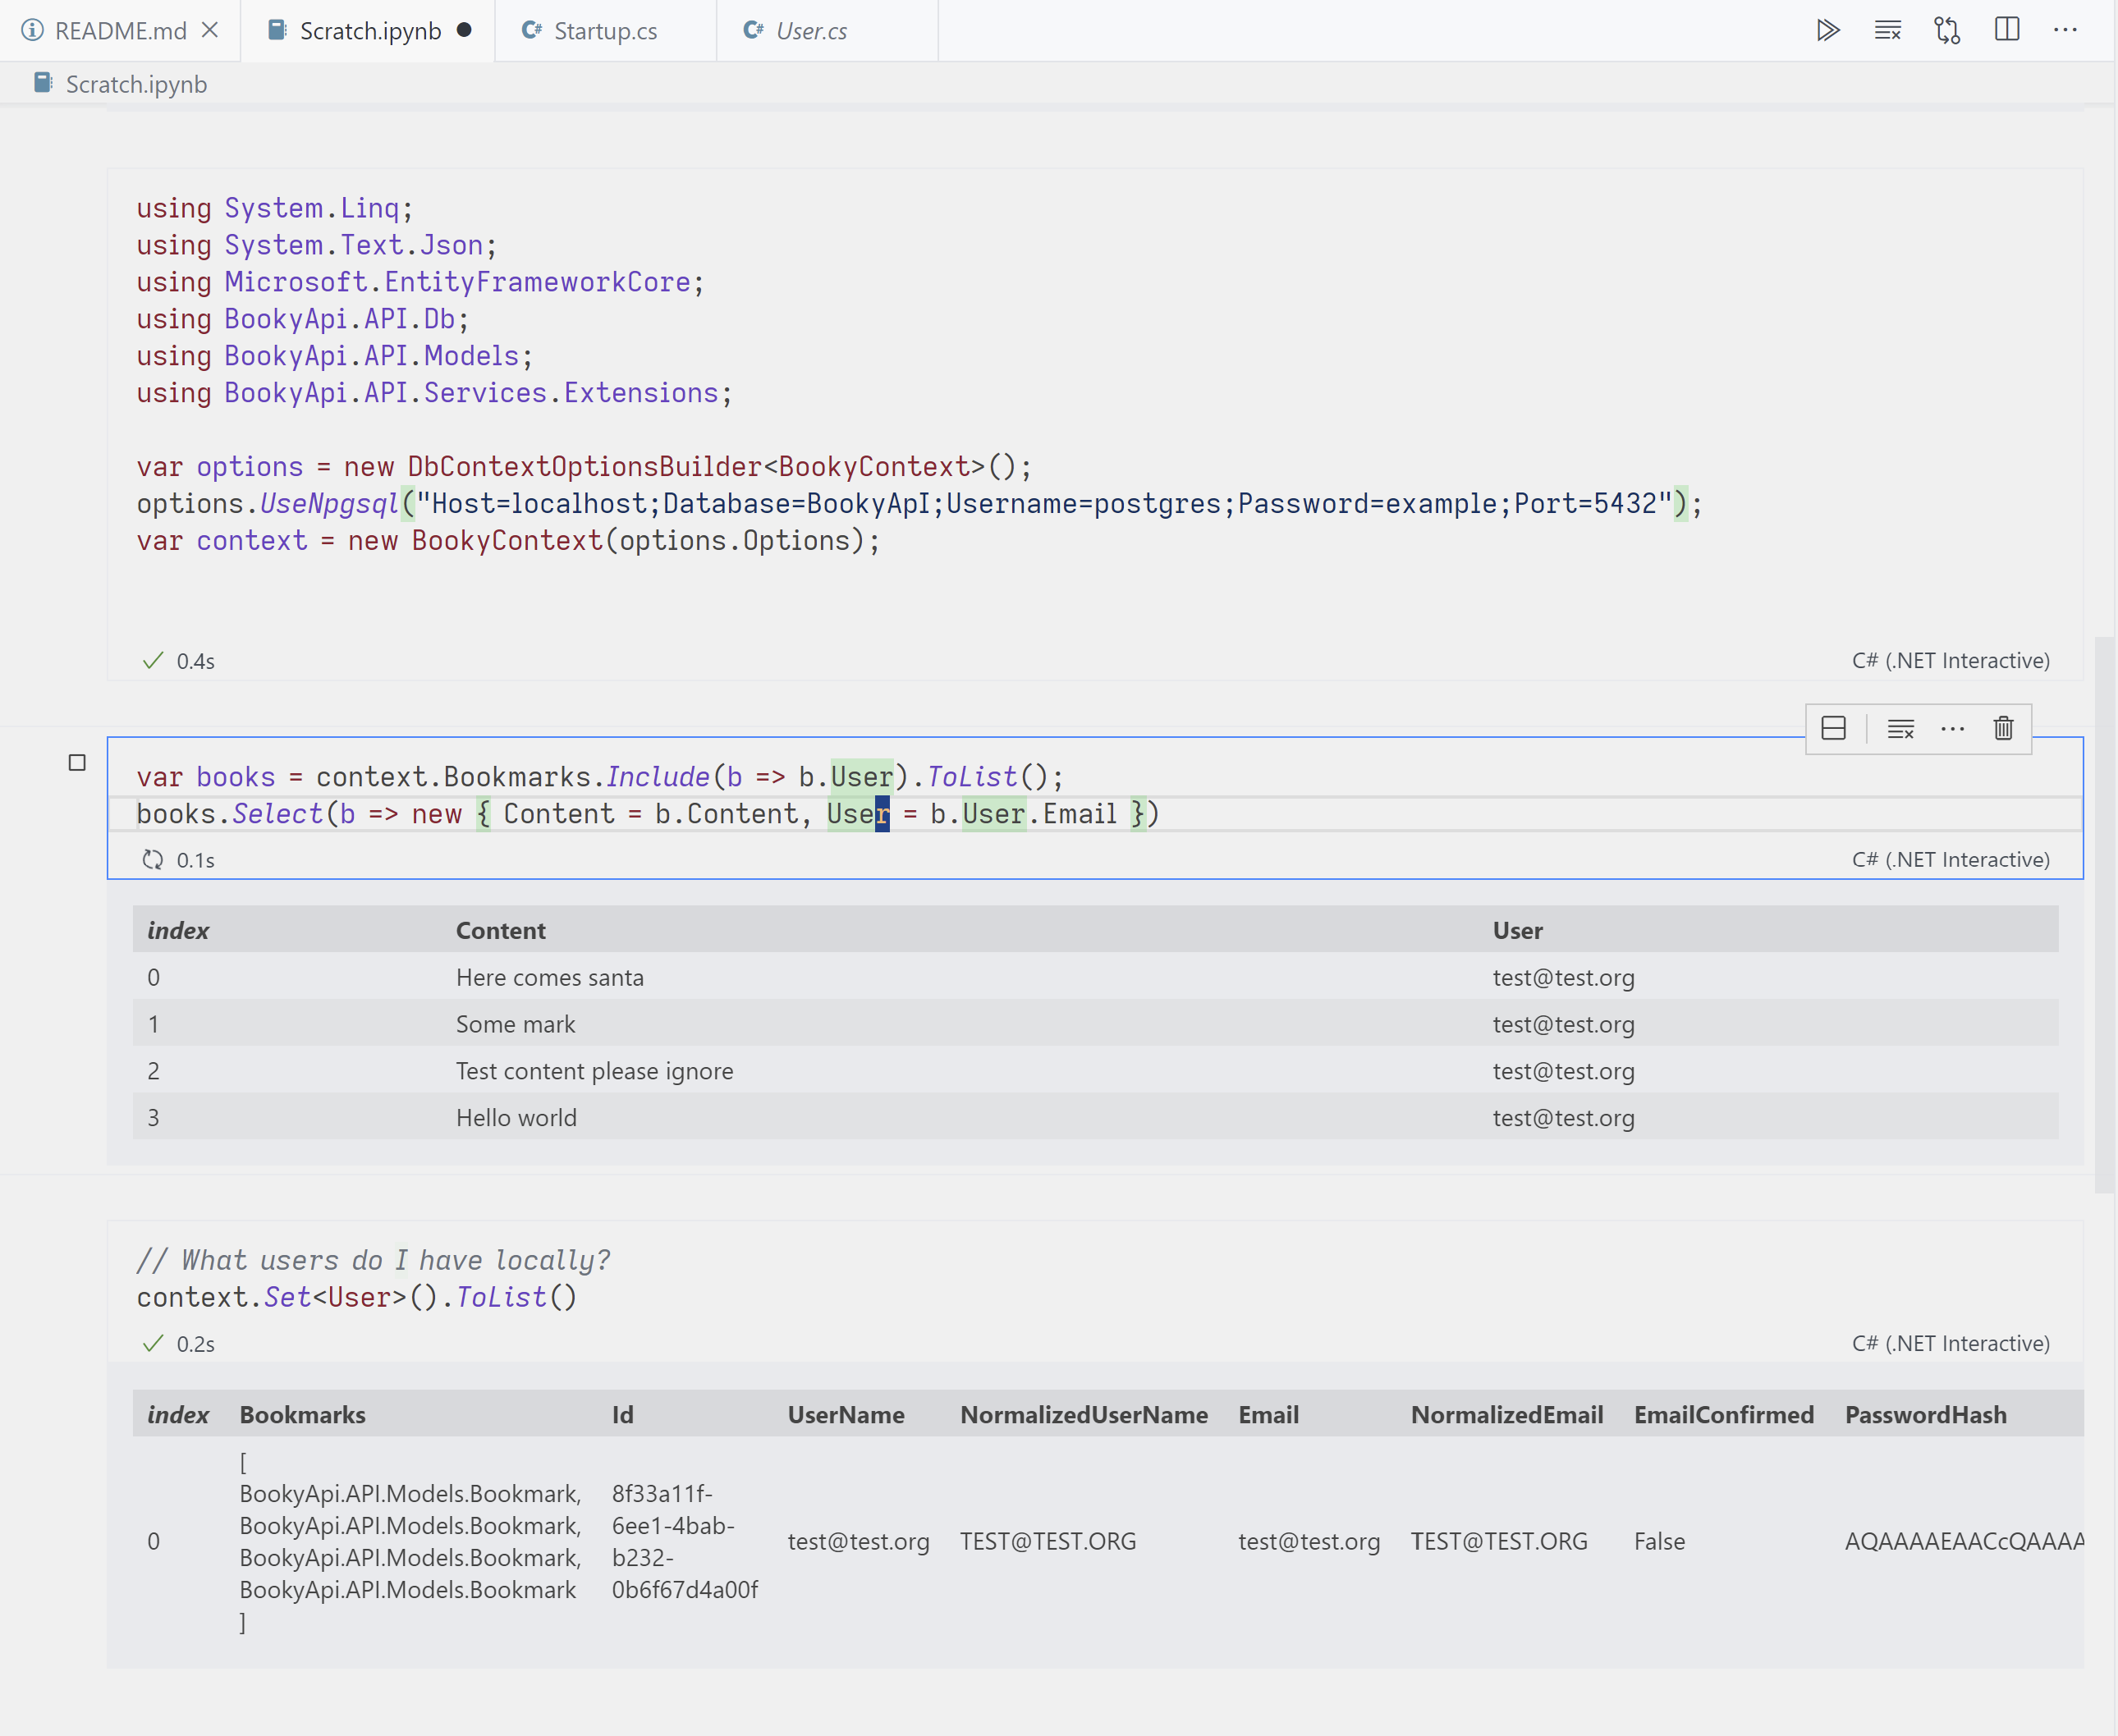
// Example: What bookmarks are in my database?
// Let's make sure my anonymous projection works as I intend it to!
var bookmarks = context.Bookmarks.Include(b => b.User).ToList();
bookmarks.Select(b => new { Content = b.Content, User = b.User.Email })

/* Output:
index	Content	User
0	Here comes santa test@test.org
1	Some mark test@test.org
2	Test content please ignore test@test.org
3	Hello world test@test.org
*/
Conclusion
All in all, dotnet interactive was surprisingly easy to set up in this toy project. It really gives a dynamic-language feel to working with C#. Everything could be done in SQL, or with another tool like Linqpad (if you aren’t on Linux), but I would recommend giving dotnet interactive a shot.
The biggest hassle with this setup is loading the DLLs and packages manually - it would be much easier to simply reference the csproj of the current project and build a notebook in that context. Maybe that will be possible in future versions.
Thanks!